-
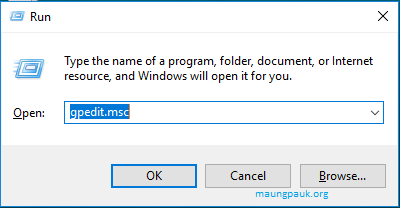
Win+R ကိုႏွိပ္ၿပီး ေပၚလာတဲ့ Run Box ထဲမွာ giedit.msc ဆိုၿပီးရိုက္ထည့္ကာ Enter ေခါက္လိုက္ပါ..
Local Group Policy Editor ရဲ႕ ဘယ္ဘက္အျခမ္းက Computer Configuration ေအာက္က Administrative Templates ကိုခြဲ.. Windows Components ကိုခြဲ.. Windows Update ကိုႏွိပ္ပါ...
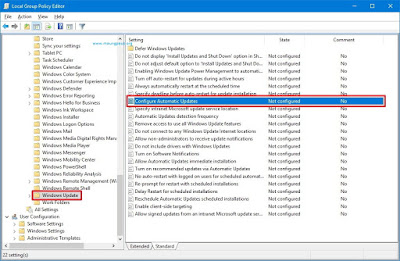
ညာဘက္ျခမ္းမွာ Configure Automatic Updates ဆိုတဲ့ စာတမ္းကိုရွာၿပီး Double Click ေခါက္ပါ..
Box အသစ္တစ္ခုထြက္လာပါမယ္..
အဲဒီမွာ Configure Automatic Updates စာတမ္းရဲ႕ ေအာက္နားမွာ Enable ကိုေရြးပါ..
Options ေအာက္က Configure Automatic Updating ေအာက္မွာ Drop Down Menu ကိုႏွိပ္လိုက္ရင္ ေရြးခ်ယ္စရာ (၄)ခုရွိပါတယ္..
2 - "Notify for download and notify for install."
Update ကို Download မလုပ္ခင္နဲ႔ Install မလုပ္ခင္ သတိေပး
3 - "Auto download and notify for install."
Update ကို အလိုအေလ်ာက္ Download လုပ္ၿပီး Install လုပ္ဖို႔ သတိေပး
4 - "Auto download and schedule the install."
Update ကို အလိုအေလ်ာက္ Download လုပ္ၿပီး အခ်ိန္ဇယားသတ္မွတ္ကာ Install လုပ္မယ္
5 - "Allow local admin to choose setting."
ကြန္ပ်ဴတာ Admin က Setting ကိုေရြးခ်ယ္မယ္..
တို႔ျဖစ္ပါတယ္...
ကၽြန္ေတာ္ကေတာ့ နံပတ္ ၂ (2 - "Notify for download and notify for install.") ကိုေရြးလိုက္ပါတယ္..
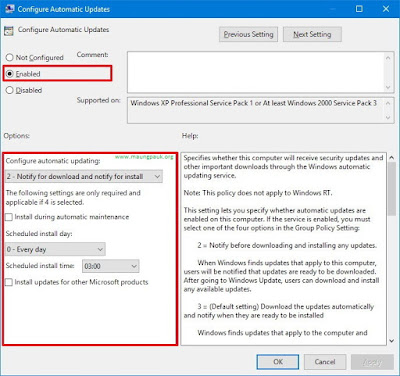
ဘာျဖစ္လို႔လဲဆိုေတာ့ Automatic Update ကို ပိတ္လို႔မရပါဘူး.. အခု ကၽြန္ေတာ္ေရြးလိုက္တာက Update ကို Download မလုပ္ခင္ကတည္းက သတိေပးခိုင္းဖို႔ ေရြးခ်ယ္လိုက္တာပါ.. ဒါမွသာ ကြန္ပ်ဴတာက Automatic Update လုပ္ဖို႔ သတိေပးတဲ့အခါ ကၽြန္ေတာ္က Download မလုပ္မခ်င္း Update က အလိုအေလ်ာက္ Update မျဖစ္ေတာ့ပါဘူး..
ၿပီးရင္ေတာ့ Apply ႏွိပ္၊ OK ႏွိပ္ၿပီး ကြန္ပ်ဴတာကို Restart လုပ္ေပးလိုက္ပါ..
ဒီနည္းလမ္းက သေဘာက်ၾကမယ္ မထင္ေပမယ့္ ကၽြန္ေတာ္ေတြ႔သမ် နည္းလမ္းေတြထဲမွာ အဆင္အေျပဆံုးျဖစ္ပါတယ္..


0 comments:
Post a Comment